Skill Level
Intermediate
Time to Make
1 hour 30 minutes
Adult Supervision Needed
Yes
How to Make
- Take four A4 pieces of white card and slot together into one larger piece. Secure in place with clear tape along the join, ensuring the edges butt up flush so that there is so gap along any join. Then, flip the newly-made card over so that the tape is on the reverse.
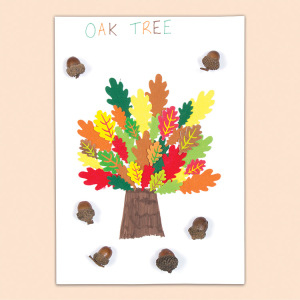
- Draw a large ‘lollipop’ tree outline across the whole newly-formed piece so that each section has an equal amount of the main tree and the trunk is split between the two bottom pieces of card, as shown.
- Draw a line along the bottom of the right-hand side to demonstrate grass, as shown. Now it’s time to decorate each section of your season tree. The seasons are started in the top left-hand corner, Spring, Summer, Autumn then Winter, as shown.
- Colour in the main trunk with brown pencil then draw ‘bark lines’ in brown pen. Draw chunky branches throughout the tree, as shown. Outline them in pen, colour in brown pencil, then add bark lines in pen as before for the trunk.
- Start in the bottom left with Autumn. Pour out orange, yellow and red and brown paint. Then finger paint leaves along the branches, starting with one colour, leaving it to try then moving on to another colour. When most of the gaps between the branches are filled with Autumn leaves, leave to dry and colour in the background to the tree in light blue pencil – you can add a little red and orange to create the appearance of a setting sun if you wish.
- Next move onto the top left section – Winter. Using a Glue Gun, apply lines of glue along the branches then apply cotton wool to create the appearance of snow, as shown. Add snowflake stickers to the sky area around the tree.
- Now it’s time to work on the top right-hand section of the tree. Pour out light green (or mix up a light green) and finger paint full, green leaves along the branches, as shown. Make sure the entire section of the tree is covered. Leave to dry.
- Pour out purple paint and, once the green is dry, apply little rows of fingerpainted blossom along some of the branches. Leave to dry. Draw a sun half covered by a grey cloud using felt pens. Colour in the remaining sky using light blue pencil.
- To finish the tree, decorate the Summer section. Use a darker green paint and finger paint leaves all along the gaps between the branches until the tree is completely green, as shown. Leave to dry. Colour in the background in a darker blue pencil and colour the grass along the bottom in green felt pen. Add some flowers using different coloured pens, as shown.
- Once the green paint is dry, pour out red paint and finger paint apples along the branches of the Summer tree, as shown. Leave to dry. If desired, children can label each season by handwriting it in the sky section of each picture.


Top Tip
Make sure you cover all surfaces before finger painting and wash hands between each colour to avoid any cross contamination
Tagged with: