Skill Level
Intermediate
Time to Make
2 ½ hours plus glue and paint drying time
How to Make
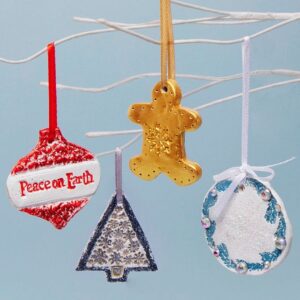
BAUBLES
- Using the metallic acrylic paints, paint 2 craft baubles of each of these colours- red, gold and green. Allow to dry.
- Cut 6 different lengths in the red, green and gold festive ribbon. (None too short, they can always be cut down).
- Pull out the hanging string from the bauble. Open the hole a little more by poking the hole with a sharp pencil or tool.
- Fold or roll the end of a ribbon so its small enough to fit into the bauble hole, add a dot of hot glue into the hole, push in the ribbon end and hold until glue dries. Continue like this for the other 5 baubles.
- Take the metallic pony beads and slide 3 of these onto the ribbon, (alternate colours). Just before reaching the bauble, add a dot of hot glue onto bauble, right next to the ribbon and lower beads pressing them onto glue and bauble. Repeat this for all the baubles.
- Measure the diameter of a bauble and cut a length of acrylic gem ribbon accordingly, either 2 gems/3 gems wide. Apply a thin bead of hot glue onto wrong side of gem ribbon and then wrap around bauble ensuring ends meet at back of bauble.
- For striped baubles cut 2 strips of gem ribbon, 2 gems wide, to diameter measurement. Again apply a bead of hot glue on wrong side of ribbon and stick ribbon from top of bauble right round to other side ensuring ends are in line. Repeat with other ribbon so that ribbons cross over at base.
PINE BRANCHES
- Take an artificial pine branch, part the fir along the stem and run a small bead of hot glue along it. Place the stem of another branch onto that ensuring the base sits on the top of the other branch so it looks like one whole branch. Hold until glue dries. Continue to make the following;
- x2 – 4 branches long
- x4 – 3 branches long
- x4 – 2 branches long
You will need;
PINE CONES:
- Holding a pine cone from the base and upside down, lightly paint using metallic silver acrylic paint from the middle to the tip. Do so all the way around and then sprinkle white iridescent glitter over the painted cone, covering most of the paint. Tap to allow excess to fall off and allow to dry.
- Repeat as above for another 5 cones.
THE WHOLE DECORATION
- Take the round craft wreath and fold in half with the hanging hole being on the fold. Lay flat so that the curve of the semicircle is at the bottom. Mark the vertical centre of the semicircle on the inside and top, this will act as a guide when placing branches.
- Open up the semicircle and position a 2 long branch on the centre line, stem on card, base of pine on edge of semicircle. Either side of that place the 3 long branch, then the 4, then 3 and finally the 2 which should be at fold of the semicircle. Space the branches evenly and balance on both sides.
- To stick each branch down, run a bead of hot glue on the back of the stem and hold down onto the base until dry.
- At the centre top, stick a 2 long branch, either side of that stick a single branch at an angle following the curve. Close the semicircle and either side of the centre branch, on the top stick a single branch at an angle following the curve. Bend the stem to help stick it down flat. Hold until the glue dries. Manipulate the branches to bend into positions that look best if need be.
- At the opposite fold to where the hanging hole is, make another hole on the fold. Cut a ribbon length of 45cms and pull each end through the holes and knot. Cut any loose ends.
- Take the pine cones and baubles and place between the branches in varying lengths and colours. It may be best to hang the decoration and temporarily stick the ribbons with blue tack so you can step back and see if the decoration is balanced and in proportion. You can either place the ribboned baubles and pine cones on the inner, outer or back of the semicircle to create that.
- When you are happy with your decoration lay it flat and using the hot glue, stick the ribbons down, allow glue to dry and cut away any excess ribbon.
- Run thick beads of hot glue along the inner edges of the semi-circle and quickly fold over the top and hold down firmly until the glue dries. Edges should be stuck shut. Any gaps should be closed using more glue.
- Using extra strong PVA glue, brush over the top semicircle. Use a lot and then stick dried moss over it ensuring there is no loose moss. Let this dry then repeat for the back of the decoration.
- To jazz up the 3 glitter bows, stick a small strip of gem ribbon around the middle. Cut the tie ends at the back first.
- Place the bows evenly on front of the decoration and then stick down with hot glue.


Top Tip
Mixing and matching the colours of the baubles, ribbons, beads and gem ribbon (e.g. green bauble, red ribbon, green & red beads and red gem ribbon), creates a greater finish and interest.