
Skill Level
Easy
Time to Make
45 minutes
Adult Supervision Needed
Yes
How to Make
-
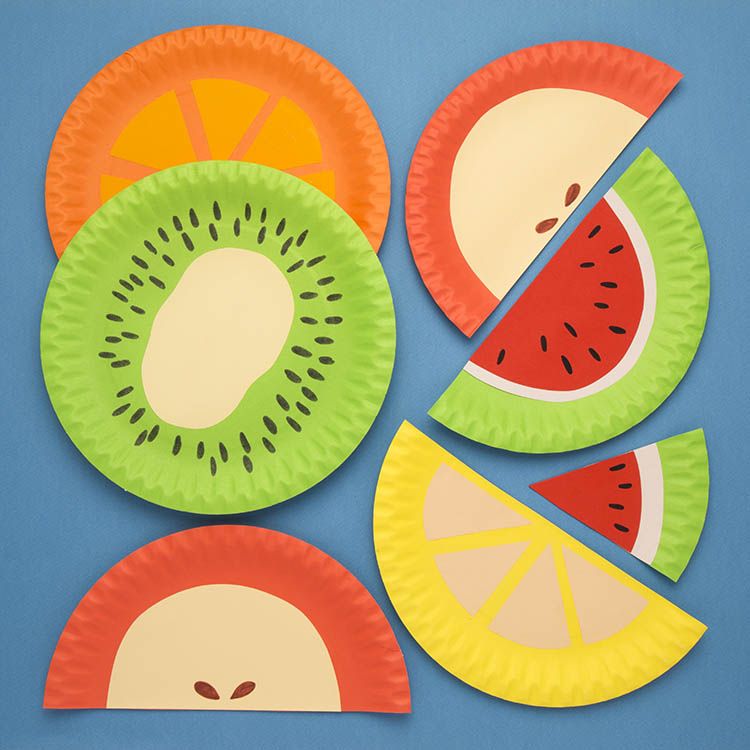
Apple Slice
- Take a red or a green coloured paper plate and cut it in half.
- Draw around one half of the plate using a pencil on a sheet of pale yellow paper to draw a semi-circle. Draw a slightly smaller semi circle inside roughly 3cm in from the edge but meeting equally on the straight line. Cut out this smaller semi-circle.
- Stick the pale yellow semi-circle onto the half paper plate using a glue stick.
- Using a brown pen draw 2 apple seeds on the straight edge of the apple slice.
-
Lemon Slice
- Take a yellow coloured paper plate and cut it in half.
- Cut out 4 triangles 6cm high from a sheet of pale yellow paper. Cut the bottom of the triangles with a curve so that they fit nicely around the curve of the lemon slice.
- Stick the triangles onto the half paper plate using a glue stick.
-
Watermelon Slice
- Take a green coloured paper plate and cut it in half.
- Draw around one half of the plate using a pencil on a sheet of white paper to draw a semi-circle. Draw a slightly smaller semi circle inside roughly 3cm in from the edge but meeting equally on the straight line. Cut out this smaller semi-circle.
- Draw around the white semi-circle onto a sheet of red paper. Draw a slightly smaller semi circle inside roughly 1cm in from the edge but meeting equally on the straight line. Cut out this smaller semi-circle from the red paper.
- Stick the red semi-circle onto the white semi-circle using a glue stick. Stick the white semi-circle onto the green half paper plate.
- On the other half cut from the green paper plate, cut off a triangle shape to make a smaller watermelon slice
- Draw around the green triangle piece of paper plate using a pencil on a sheet of white paper. Draw a slightly smaller triangle with a curved bottom inside the shape roughly 3cm in from the edge but meeting equally on the straight sides of the triangle. Cut out this smaller triangle.
- Draw around the white triangle onto a sheet of red paper. Draw a slightly smaller triangle inside roughly 1cm in from the edge but meeting equally on the straight sides of the triangle. Cut out this smaller triangle from the red paper.
- Stick the red triangle onto the white triangle using a glue stick. Stick the white triangle onto the green triangle piece of paper plate.
- Using a black pen draw a few spread out black seeds onto the red paper on the half a watermelon and the triangle slice.
- Using a black pen draw lots of seeds around the pale yellow centre of the kiwi.
-
Half an Orange
- Take an orange coloured paper plate.
- Cut out 6 triangles 7cm high from a sheet of light orange paper. Cut the bottom of the triangles with a curve so that they fit nicely around the curve of the orange.
- Stick the triangles facing inwards going round in a circle onto the paper plate using a glue stick.
- Using a black pen draw lots of seeds around the pale yellow centre of the kiwi.
-
Half a Kiwi
- Take a green coloured paper plate.
- Cut out a wiggly oval shape from pale yellow paper for the centre of the kiwi. Stick the shape into the middle of the green paper plate.
- Using a black pen draw lots of seeds around the pale yellow centre of the kiwi.


Top Tip
By cutting the fruits into halves and quarters, they can also be used as a visual numeracy teaching aid.