Skill Level
Beginner
Time to Make
30 minutes + drying time for paint and glue
Adult Supervision Needed
Yes
How to Make
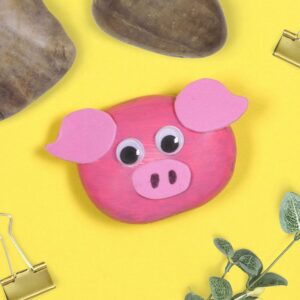
- Lightly rub the wooden coaster fine sandpaper to smooth down the surface and edges. Mix together a small amount of red paint with some white to make a pale pink colour. Brush the paint all over a wooden coaster for the head, including around the edge then leave it to dry. Brush paint over the lid of a small craft box for the nose and leave it to dry.
- Glue around the edge of the painted nose then press it onto of the head and leave to dry. Position the nose slightly off-centre, leaving enough space for the eyes.
- Cut out 2 matching ears from pink card. Carefully curl the ends of the ears then glue to the back of the head and leave to dry.
- Use your finger or a brush to paint a gold dot pattern onto the pig’s face. Leave to dry.
- Glue 2 wiggle eyes above the nose. Stick 2 gems onto the nose for the pig’s nostrils.
- Cut a 30cm piece of gold cord, tie a knot about 6cm from the ends to make a loop, thread a gold bead over the end and tie a double knot underneath. Glue the ends of the cord onto the back of the pig and leave to dry.


Top Tip
Try painting the nose in a slightly darker shade from the light pink on the head, which will help the pig look more 3D. Or you may choose to use some different colours.
Tagged with:
Chinese New Year