Skill Level
Intermediate. Adult supervision needed
Time to Make
1.5 hours + drying time for clay and paint
Adult Supervision Needed
Yes
How to Make
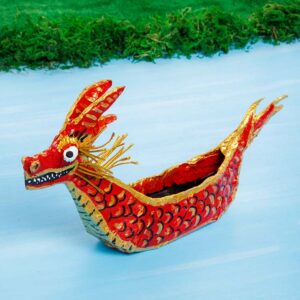
- To make the dragon’s body, break off a 5cm ball of clay. Keep any unused clay wrapped in the packaging inside a plastic bag so it doesn’t dry out.
Roll the clay between the palms of your hands to make a smooth ball then carefully squeeze it to start making a thick sausage shape. Before the clay gets too long, place it onto your work surface then roll it out with your fingers to make a long smooth shape, approximately 24cm in length, tapering at one end.
To make the spines along the dragon’s back, pinch the clay all the way along the top then press cocktail stick or modelling tool to shape a zigzag.
Carefully bend the body into a curved ‘S’ shape. Smooth and shape the clay with your fingers. Add some water to the clay if it starts to dry out or crack around the edges. - To make the dragons head, shape a 3cm clay ball into a 5cm oval. Use the flat end of a modelling tool to carefully cut the dragon’s mouth. To attach the head, flatten the thick end of the body at the neck then score small lines into the clay using a modelling tool, add some water then press the head in place.
Shape small balls for the eyes and nostrils and press onto the body. Add 2 horns and a tongue. To make the details on the dragon’s head, flatten a small clay circle, cut into the sides with a modelling tool then press onto the dragon’s head, repeat on the opposite side. - To make a leg for the dragon, shape a 2cm clay ball into a 4cm oval. Bend the clay in the middle then use a modelling tool to cut the toes. To attach the leg, score small lines in the surface of the clay on the dragon’s body using a modelling tool, add some water then press the leg in place. Adding a small clay ball under the toes to helps to hold the curled shape and makes the shape less fragile. Make 3 more legs in the same way.
- To make a surface pattern, press a drinking straw cut in half all over the dragon’s body for scales.
- Check the shape of the dragon before leaving it to dry. If the head or tail starts to droop, support the clay with a glass jar or a container so they stay in place.
Leave the dragon to thoroughly dry out. Avoid leaving it on a piece of card or near a radiator as the clay may crack if it dries out too quickly. - Mix up some green paint with a small amount of blue and yellow to make it look like an emerald jade colour. Brush paint all over the dragon, working it into the joins, inside the mouth and underneath, so the whole model is covered. Leave to dry. Lightly brush streaks of gold paint over the top.


Top Tip
Keep the shapes on the dragon simple and bold so the pieces aren’t too thin. If any pieces look fragile or need filling in where they’ve been attached, add a bit more clay then smooth the surface around the join with a modelling tool.
Tagged with:
Dragon